Tuesday 17 March 2015

Modern City Terrain part 2: Building

In part one of this series, I showed the materials and tools I used to build my superhero terrain.  In this part I will show you how to go about the build.

1-  Plan.  Before you start plan out what you want to build and what cuts and pieces you will need.  This just makes it a lot easier to cut.

2- Using 5mm foamcore, cut out the wall pieces from your plan.  I make my building 3"-4" in height, with varying widths.  The larger auto-repair shop is 8" across and 5" deep for example.

3- Once the walls are cut out, measure and cut the doors and windows.  I've not really got a perfect size for doors as yet.  I think about 4cm wide by 5cm high is about right, but judge it yourself depending on the scale of the minis you are using.  Keep the off cut foamcore, it often comes in useful later on.

With the windows and doors cut out, use some all purpose filler to smooth out the inside of the windows and doors.  This helps protect the foam and looks better than leaving it bare.

4- To make sure the walls fit snugly together, on the front wall and rear wall interiors, measure a 5mm strip from each vertical edge.  Using your Stanley knife or hobby knife, cut through the top layer of plastic and along your 5mm line, then pick off the foam underneath just leaving the other layer of plastic card.  This is where the side walls will fit.

5- You can either add details at this point or after.  Let's assume you're doing it now as its a bit easier.  You will want to add things like window sills (using matchsticks), doors (using thin card), thing like that. You can also add damage to the building, by inscribing with something pointy but not too sharp like a sculpting tool or a Phillips screwdriver.  You can further add wear like I did on the abandoned building by pulling away the top layer of plasticard and stamping a brick pattern into the foam.  I used an old brush with the bristles cut off and then squashed the metal ferrule into a rough rectangle shape.  You can also add brick work detail using the self adhesive paving stones (glue them though with PVA, rather than relying on the self adhesive-ness).

6- Cut your cork tile next to shape.  I allow 2" in the front for a pavement and 1" around the sides and rear.  I've been using the sealed side up and I suspect it is probably stronger, but I don't know that it makes any difference.  I mark out these on the tile in pen so I can see where my walls need to go.

7- Ready to glue now!  I've been using UHU all purpose glue to glue the walls, but you could use PVA, hot glue gun etc.  Glue the walls together, and glue them to the base.  Leave it to dry.

8- Roof next.  If you roof is going to fit inside your building (see my auto-repair shop and abandoned block for an example), then you will need something to support the roof, which you can use foamcore (like the off cuts from the windows and doors) or balsa for example.  Use super glue to glue in foamcore supports onto the interior walls.  These should be 1-2cm from the top lip of the wall.  Measure the inside of the walls area, and knock off couple of millimetres of each side.  Cut out the roof from the artist mount board.  You may need to take a little more of each side so it fits inside the roof.  On the taco stand below the roof just fits on top here rather than lifting off.


9- Next step is to texture and fill the building.  This is done with the multipurpose filler and a coffee stirrer to smooth it out.  Fill in any gaps, such as on the corners and around the roof.  Texture the walls by mixing some filler with water and spreading it onto the walls and the base.  Once you've done that, with a large brush just poke the filler all over to add a random pattern all over.


And you are done!  In part 3 I will talk about painting.

Monday 2 March 2015

Modern city terrain build part 1: Tool and materials

I've been building a lot  of terrain recently for a modern city board, it's a project I've actually been really fired up about.  I will be using the board to play Pulp City currently (my Kickstarter has arrived, and it looks great) as well as Batman Miniatures Game in the future.  They'd be nothing to stop me using it for a zombie game or something but I've no plans to do that yet.  Here's some pictures of the first 2 buildings, an abandoned block and an auto-repair shop:


I've shared the pictures on Twitter and on the "Citizen of Pulp City" FB group, and a few people have said they were interested in a tutorial on how I built them.  It's a fairly simple method (if I can do it, anyone can).  This will be the first part of the tutorial, where I will cover materials used, tools and paints.

Tools:

This is most of the stuff I used I think in the photo:

-Pencil - Marking up foam core, cork and marking for freehand work.
-Rulers - Steel one for cutting against, plastic one for just measuring
-Square - Useful for getting straight lines when you're cutting
-Heavy blade- I use a heavy Stanley knife with a fixed blade for cutting foam core, cork, card etc.  Whatever your preferred knife is, it needs to be strong and sharp.
-Hobby knife - General blade for lighter cutting and scoring
-Green stuff - Used for making details like the bin bags, Coke can etc.
-Clay shapers - Used for green stuff sculpting.
-Superglue - For small scale gluing when I need something to stick quickly.  I use Loctite Ultra Gel by preference, but just use whatever your favourite brand is.
-General glue - This is the UHU stuff here, I've been using it to stick walls together as it dries a bit quicker than PVA and holds things together when drying.  Could easily use superglue, PVA or a hot glue gun here though.
-PVA glue - Large scale sticking of stuff and sealing surfaces.  Mine's from Poundland, works fine.

Not shown in the photo (as I forgot them):
-All purpose household filler - Poundland again.  I believe they call this spackle in the US.
-Fine point pen - 0.5mm tip black ink pen, I use this for marking the pavements.
-Scissors
-PC and printer
-Matt varnish - Sealing weathering powders
-Gloss varnish - For the bin bags
-Philips screwdriver - Used this for scoring the cracks into the buildings.

Materials:

-5mm Foam core - This is what I used for the walls in all the buildings.  A1 sheet from Hobbycraft is £4 and you can get pretty much a whole table of terrain from it.
-Artist mount board - It's thick card basically.  £3 from Hobbycraft for an A1 sheet.  I use this for roofs mainly.
-5mm Cork floor tiles - These are used for basing mostly to give the foam core walls more strength from a solid base.  The only ones I can find in shops are sealed on one side, and unsealed on the other.  I haven't found a modelling difference between the two sides yet, I'm still experimenting on that.  These are £9 for 9 12"x12" tiles from Wickes, should be enough to do my whole board.
-Wire mesh - I used this for the windows on the repair shop.  Mine's from a peanut feeder for birds, Poundland purchased.
-Thin card - Cereal box.  This is used for doors and that kind thing.
-Coffee stirrers - Used for wood panelling and for making palettes.  Also useful for smoothing filler.  Easily borrowed from your favourite coffee chain.  I bought 1000 in fact, for the price of a coffee in Starbucks, on eBay.
-Match sticks - Window ledges and frames.  Got these on eBay for very little.

Not shown in the picture:
-Printer paper - For printing posters, signs etc.
-Self adhesive paving stones - Mine are from eBay and labelled as "OO Self Adhesive Stone Paving Slabs" by Metcalfe.  Not strictly required, you could use card instead, but I used these for the stone work on the buildings.

Paints and brushes:
-Grey spray paint - I'm using Plasticoat grey matt spray for this, but use your preferred brand.  I like the Plasticoat one as it's a fairly mid-tone grey, it covers well and it's very matt.  Foam core takes paint well so I think one can should be enough for the 7 building I have planned.
-Various greys - Some grey tones for drybrushing the sprayed building.  I use Dulux testor pots in 3 shades (mid-grey, light grey, white) for this as it is more economical to use household paint than model paint for terrain.
-Selection of model paints and washes - Your usual miniature paints for various details.
-Weathering powder - Used for soot effects, dirt round the building bases and the pavements.  I use Forge World Dark Earth and Black Soot, but lots of others are available.
-Selection of brushes - I used everything from a 000 point brush to a 1" paint brush.

-----------------------------------------------------------------------------------------------------

Most of this stuff I already had.  I would estimate I've spent about £25 so far on materials, which should be enough to cover me for the whole table.

So that's part 1, I'll post a part 2 soon covering the build.


Friday 7 March 2014

Malifaux: What can Marcus hire?


After the tournament at the weekend, I've been feeling the itch to play Marcus.  I actually own Marcus already (pictured above) and the Jackalope already as I planned to try them in 1.5 but then never got round to it.  I played against a Marcus crew in game 3 at the weekend and it looked to be a lot of fun.  This might be a project I never get round to, or one that will come later in the year but I'm toying around with it anyway.

I don't own any Arcanist beasts other than the Jackalope so I've been looking round at what I can use with him.  Similar to Zoraida, Marcus has a lot of scope for hiring out of faction models using his "Call of the Wild" ability so for my own reference here is a list of all out of faction models available to Marcus.   I reference the rule which allows him to hire them in brackets:

GUILD
Guild Hound (Call of the Wild)

RESURRECTIONISTS
Canine Remains (Call of the Wild)
Rogue Necromancy (Call of the Wild)
Night Terror (Call of the Wild)
Shikome (Call of the Wild)

ARCANISTS 
Home faction so all available.

NEVERBORN 
Silurid (Call of the Wild)
Waldgeist (Call of the Wild)
Spawn Mother (Call of the Wild)
Gupps (Call of the Wild)

OUTCASTS
Hannah (Mercenary)
Taelor (Mercenary)
Student Of Conflict (Mercenary)
Malifaux Child (Mercenary)
Bishop (Mercenary)
Convict Gunslinger (Mercenary)
Desperate Mercenary (Mercenary)
Freikorps Specialist (Mercenary)
Freikorpsman (Mercenary)
Hans (Mercenary)
Johan (Mercenary)
Killjoy (Mercenary)
Ronin (Mercenary)
Freikorps Librarian (Mercenary)
Freikorps Trapper (Mercenary)
Lazarus (Mercenary)
Sue (Mercenary)
Ama No Zako (Mercenary)
Strongarm Suit (Mercenary)

GREMLINS 
Hog Whisperer (Mercenary)
Piglet (Call of the Wild)
War Pig (Call of the Wild)
The Sow (Call of the Wild)
McTavish (Mercenary)
Burt Jebsen (Mercenary)
Gracie (Mercenary)
Wild Boar (Call of the Wild)
Bayou Gator (Call of the Wild)

TEN THUNDERS
Dawn Serpent (Call of the Wild)
Oiran (Mercenary)
Torakage (Mercenary)

Monday 3 March 2014

Malifaux: All my prize winning Swamp Fiends

I took the Swamp Fiend's to a tournament in Sheffield last weekend (32 players).  Gaming-wise I did terribly, with 2 draws and a loss.  Painting-wise I did excellently and managed somehow to win Best Painted Crew!  I didn't get a picture at the event, but here's the full lot:


I was absolutely amazed and delighted to win!

Friday 28 February 2014

Malifaux: Swamp Fiends!

Apologies for the sizing of the pictures in the post.  Turns out the Blogger iPad app is gash.  Click on the photo for a full view.

Ahead of a tournament this weekend, I've finally got all my Swamp Fiends done.  I've now got one of every Swamp Fiend model in the game, with the exception of Wild Boars since they don't look like they'll work that well with Zoraida (might be a future crew though...).

First up, Waldgeist:


No prizes for guessing the origin of these.  I don't have a problem with the current Wyrd Waldgeist, it's just it looks naff all like the card.  The foliage is from Army Painter/Mininatur and is called poison ivy but you can see if works quite nicely as generic leaves.

Next on the table was the Spawn Mother:


This was a great model to paint.  The base was a bit of a challenge as it's very flat given it's supposed to be water, plus I had to try and get it to look OK with all my other bases in the crew with going over board on the green colour.  I went for a kind of blue green in the end.  If you're painting one of these, then learn from my mistake and paint the base separately to the model.  Getting all the babies painted without messing up the Mum was a pain.

The Spawn Mother of course needs some Gupps:


Gupps come three to a blister so I stretched mine out by putting two per base and I think it looks OK with the extra bits of detail I added to the base.  I made some spawn egg markers as well but they're a bit rubbish.

So that finished all my Neverborn Swamp Fiends:


I'm happy with how they turned out and the basing scheme I chose for them.

But, now I needed some Gremlin Swamp Fiends.  Next was a quick paint job of some Bayou Gators:


I managed to find a shade of green I hadn't already used!  These guys are from Titan Forge Miniatures.  They're resin and cost me about £3.50 a piece from Element Games.  They are fairly substantial though (those are 40mm bases) so I'm looking forward to seeing how the official Wyrd ones eventually turn out.

McTavish was next up.  I don't really like the official model so I went with a proxy:


This is Fon the hunter from Tale of War.  I can't believe that they didn't design this as a McTavish proxy, he's that perfect for it.  This was a great model to paint.  With a weapon swap you could also make this guy into a pretty convincing Johan as well since the Gator is a separate piece.

McTavish is on a 50mm base and this model is not actually that big so I bulked out a base with a bit of scenic base work.  It look good, but it's really nothing special.  The bulk of it is a scrap of insulation foam I shaped with my fingers.  Beyond that I added a piece of slate, sand, stones and half a barrel from an GW Ogre model.  Once painted I added the reeds (old paint brush bristles), tufts (Army Painter) and bits of flock.  Looks pretty good I think.

For all my bases I have used Vallejo still water effects.  It's really good stuff, I'd recommend it highly (I used it before on my Hamelin crew) and I've even used it to make large ponds.  For pretty much all the bases here, after I poured the water effect I stirred green ink into it to give the swirl effect.

The crew is going to be in action this weekend at Rumble under Gaslight 2 at The Outpost in Sheffield.

Wednesday 12 February 2014

Malifaux: Zoraida's Hiring Options

Zoraida has a couple of unusual abilities when it comes to hiring out of faction models, and for my own reference I've put together a list of what she can take outside of her usual declared faction.  I've not listed below all of her in faction models which will naturally depends on whether you take her as Neverborn or Gremlin.

Her hiring restrictions are affected by two rules, one on her card...

Enthrall:  This model's Crew may hire any Living model with a Wp 4 or less as if it had the Mercenary characteristic.

...and one on her 2SS Tarot Reading upgrade:

Bayou Servants:  Crews containing this model may hire Swampfiend models regardless of faction.

Note on Enthrall, you have to hire them as if they were Mercenaries so you pay +1 SS and can only take a maximum of 2 Mercenaries.  For the sake of completeness, I've included all models with the Mercenary characteristic.

Here is a breakdown of options by faction with a summary of the rule required:

GUILD
Papa Loco (Enthrall)

RESURRECTIONISTS
Nurse (Enthrall)

ARCANISTS
Performer (Mercenary)
Malifaux Raptor (Enthrall)
Silent One (Enthrall)

NEVERBORN (assuming you're using Gremlin Zoraida, Neverborn Zoraida has whole faction available)
Bad Juju (Bayou Servants)
Voodoo Doll (Dual Faction)
Silurid (Enthrall, Bayou Servants)
Waldgeist (Bayou Servants)
Iggy (Enthrall)
Spawn Mother (Bayou Servants)
Gupps (Bayou Servants)
The Depleted (Enthrall)

OUTCASTS
Hannah (Mercenary)
Taelor (Mercenary)
Student Of Conflict (Mercenary)
Malifaux Child (Mercenary)
Bishop (Mercenary)
Convict Gunslinger (Mercenary)
Desperate Mercenary (Mercenary)
Freikorps Specialist (Mercenary)
Freikorpsman (Mercenary)
Hans (Mercenary)
Johan (Mercenary)
Killjoy (Mercenary)
Ronin (Mercenary)
Montressor (Enthrall)
Freikorps Librarian (Mercenary)
Freikorps Trapper (Mercenary)
Lazarus (Mercenary)
Sue (Mercenary)
Ama No Zako (Mercenary)
Strongarm Suit (Mercenary)

GREMLINS (assuming Neverborn Zoraida, Gremlin Zoraida has whole faction available)
Lenny (Enthrall)
Bayou Gremlin (Enthrall)
Hog Whisperer (Mercenary, Enthrall)
Piglet (Enthrall)
War Pig (Enthrall)
Pere Ravage (Enthrall)
Rami LaCroix (Enthrall)
Raphael LaCroix (Enthrall)
Rooster Rider (Enthrall)
Gremlin Taxidermist (Enthrall)
McTavish (Mercenary, Bayou Servants)
Burt Jebsen (Mercenary)
Gracie (Mercenary)
Wild Boar (Bayou Servants)
Bayou Gator (Bayou Servants)

TEN THUNDERS
Ototo (Enthrall)
Illuminated (Dual Faction Neverborn, Neverborn Zoraida only)
Oiran (Mercenary)
Samurai (Enthrall)
Mr Graves (Dual Faction Neverborn, Neverborn Zoraida only)
Mr Tannen (Dual Faction Neverborn, Neverborn Zoraida only)


I believe this to be a complete list of both wave 1 and wave 2.  Please let me know in the comments if you spot any mistakes or omissions.

Tuesday 11 February 2014

Malifaux: Zoraida Crew, Mr Graves and Mr Tannen

During a pre-Vappa lull, I managed to get some more Neverborn models finished off.  I was keen to get these ones sorted as at Vappa I put my rulebooks, card, fate deck and a few models out on a table so that I could talk to people who were passing about the game (always henching).  I used my Lynch and Zoraida crew along with my Nightmare Teddy to show to people the kind of models in the game.

Anyway, here's the completed crew for Zoraida:


I'm happy with how these turned out.  For the Silurids, I wanted to try and make them look like green poison arrow frogs which I saw at an aquarium a few weeks ago.  It's not quite how I thought they'd turn out but I'm fairly happy with them.

I've been playing Zoraida exclusively for the past few weeks and I'm still getting to grips with what she can do.  There's alot of things she can do so I'm still finding when and where to best apply here abilities.

The other model I wanted to get done was Mr Tannen.  I finished Graves a few weeks ago, so I got Tannen done to go with him:


I'm looking forward to giving these two a try out in wave 2.  I'll try them with Zoraida of course since she can pretty much work with any crew.

Friday 7 February 2014

Vappafaux 2014 Best Painted Crews

The standard of painting at Vappafaux very, very high and almost every crew picked up at least one vote.  Players were asked to choose their top three favourites in order.

I tried to grab pictures of every crew which you can see below.  Some of the pictures don't really do the crews justice as I was grabbing them on my phone while doing a million other things.


This one finished in third place:


This was the winning crew.  The photos don't do it justice, there was some amazing freehand on the back of each model:


And finally this was the second placed crew:


Thursday 6 February 2014

Vappafaux 2014 round up

I've been trying to put this post together for a few days, but work and being knackered after the weekend have prevent it.  Last Sunday was the Vapnartak convention in York at which I was running my first ever tournament:  Vappafaux.  We'd managed to sell all 30 tickets in about 8 days so there was already a good buzz about the event.  It was a long slog getting ready for the event as we had to build all the tables but we got there in the end.

We were lucky enough to be able to setup the day before so myself and my fellow TO And (@guildmonkee) had to get all the stuff together and head over to York race course where the event was taking place.  At 1pm Saturday we had boards and terrain at 4 different locations across York so a short road trip was required to get everything together prior to heading to the race course.

This is what a 30 player Malifaux tournament looks like when you load it into one car:


After a short unload (I've got a bag truck which I bought which meant we got all the boards to the second floor in one trip), we got everything laid out:


The top three tables are those nearest the camera.  Terrain-wise we had some "feature" tables with properly coherent terrain sets, and for the remainder we put out as much stuff as we could get together between And's terraclips collection and the generic terrain we had from the club.

Here's some of the feature tables:

Badlands Railway station by Sam (@Secondbreky):


  Desert board by me (cheap and looks pretty good):


Nicodem's Graveyard by me (see early posts for kit reviews on the Renedra church and grave stones):


Breachside Farm by me.  During the event, I was lucky enough to meet Walt from Commission Figurines who made the farm kit.


Ruined hamlet from Warlord Games, mine again:


Secret Mining Operation by And (@guildmonkee).  As you can see this board was a significant labour of love and alot of work went into it, but it made for an impressive result:


The Dreamer's bedroom.  This idea was stolen from Mike (@OldManMyke) who used a similar setup at 4M last year.  I partly put this together since it required very little expense or effort on my part ;)


The prize pool looked excellent in the end with excellent donations from all our sponsors:

bendyboards.co.uk
fenrisgames.com
tinyworlds.co.uk
Urban Construct (www.wargameterrain.co.uk)
warbases.co.uk

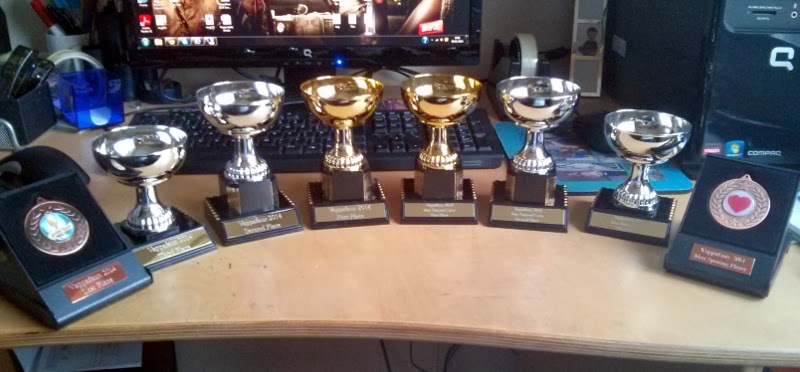
Eventually we had over £220 worth of prizes to give away, and ever single one was done by a raffle.  The tournament winners and painted prizes got small trophies:


...but every other prize was done by raffle so everyone had a chance at some swag.  There was 15 prizes I think in the end so half of all the players got a prize regardless of where they finished.

Warbases were good enough to cut us some Vappafaux tokens for the event:


We even had cake!


Overall, the event went very well and everyone seemed to have enjoyed it.  I took onboard some things I can improve on for next year and there's always things which are outside your control (the unknown unknowns as Donald Rumsfeld once said) but for my first event I was quite happy.

The full results for the event can be found on the Wyrd forums.

Monday 27 January 2014

Malifaux: Nightmare Edition Teddy

I've been a bit lax with blog posts as I've been prepping for Vappafaux this weekend, but I have got my entry for this months Tyrants of Painting contest which is being run by the Malibros.  Basically it's a themed motivational challenge each month with this months theme being "Heavy Hitters".

I got my Nightmare Teddy in the Black Friday sale so I thought I'd build him and get him done for this contest as he not a hugely detailed model so I knew I could get him done quite quickly.


I pinned the head and arm (arm required some gap filling after I cocked up the pinning), but the claws were a right pain.  Every claw on his feet and left hand is a separate piece and so some judicious use of Zipkicker was required to get them in place.  After filling and priming he was ready for the base coat:


The panda theme I stole from Mike3838 like all my best ideas.  Base coat was a a light khaki for the white and dark blue for the black parts.  This is the stage that actually took longest in the end.

Next up the white got a wash of sepia ink, then brown ink in the darkest parts.  All the fur was then highlighted with lighter versions of the base coat.  I decided to hand paint the highlights rather than drybrushing (my usual go to method for painting fur) to give a better finish which I think it has.  Here's the finished entry:


The newspaper was fun to do.  I outlined the method for doing it in a previous blog post only this time I managed to find a customizable newspaper template online, in fact it was a PowerPoint slide that I just changed the text on:


Just adds a cool little detail to the model.

The #MFXTOP voting starts tomorrow (28th) so why not head over to twitter to vote and check out the entries on the Malibros blog.